
You need to be an 'owner' of the mailbox, or part of a group which is an owner (e.g. SU.SG.Vol, SU.SG.C&S Admin, or SU.SG.Systems Admin).
Mailbox access is controlled by "access groups".
The ISD advice is available here. It is simplified below.
Finding the access groups
You do not add people to the mailbox directly, you add them to access groups. These all start with '>'.
Open the Address Book in Outlook, either from the ribbon or by pressing CTRL+Shift+B.
In Outlook for Web, use the "People" button on the left side of the screen.
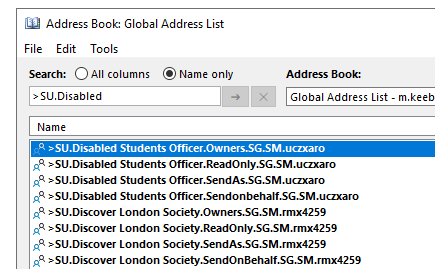
In the bar at the top, search for the name of the mailbox preceded with '>'
e.g. for SU.Systems you would search '>SU.Systems'.
- I can't find the groups for my mailbox!?
Note, some groups may not show up this way, so try:
Try variations (e.g. >UCLU. instead of >SU.) Select 'More columns' in the address book and search for sg.sm.uczxmui, where the uczxmui is the role account username. This applies for instance to:
- [email protected] / [email protected]
- [email protected] / [email protected]
- [email protected] / [email protected]
- [email protected] / [email protected]
- [email protected] / [email protected]
For some specific cases:
- [email protected] / [email protected] - search >SU.RUMS.FullAccess.SG.FM.uczxraa
When you've found the group, there will be four access groups available to add people to:
- Owner: Administrators of the shared mailbox. Owners have Full Access permissions and can Send On Behalf of or Send AS the mailbox. Owners can also change the membership to the mailbox's access groups.
- Send on Behalf: Members of the Send on Behalf access group have Full Access permissions and can Send on Behalf of the mailbox.
- Send As: Full Access to the mailbox and can Send As the mailbox.
- Read Only: Full Access to the mailbox but cannot send messages from the mailbox.
For most student cases (officers, reps, etc) use "Send on Behalf" or "Send As". Generally only staff should be added to "Owner".
Giving access to a person
- Go to https://admin.exchange.microsoft.com/#/groups
- Click on "Groups I own"
- Search for the group up the top right.
- Click on the group.
- Click on the Members tab.
- Click "View all and manage members" at the bottom.
- Click + Add members.
- Search for the person in the top right.
- Ensure you select the correct person - some may have similar or identical names!
- Check the box next to their name and click 'Add'.
Removing access for a person
- Follow the steps above to "View all and manage members".
- Find the name of the user (can use search).
- Check the box next to their name then click 'Delete' at the top of the tab.
Knowledge base
Category
- E-mail and calendar