Student Activities AV & Events Equipment
At the Student Activities Reception we have an inventory of AV & Events Equipment that can be borrowed by Club and Society presidents and treasurers and members of staff. Please consult our inventory and guide and use the AV & Events Equipment Request Form to request equipment. Note that we require at least 5 working days to check the availability of your requested equipment, process the booking and prepare the equipment for pick-up. To improve the chance of the equipment being available to book, please send your request well in advance.
What do I need for my event?
- Public Speaker/Live Music
-
To get started, request:
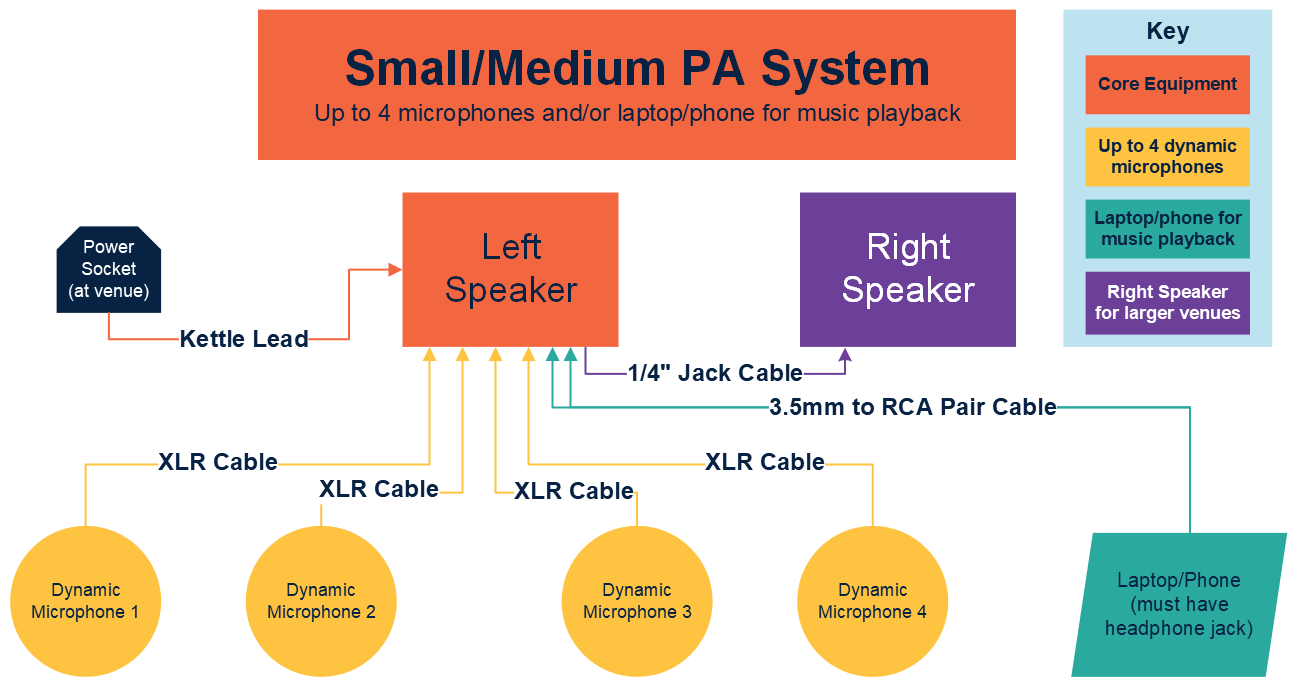
- 1 x Small or Medium PA System
- 1 x Kettle Lead
If you need to use both the left and right speakers, request:
- 1 x ¼”-jack cable
To play sound from a laptop or phone (must have a headphone jack), request:
- 1 x 3.5mm jack to RCA pair cable
For each microphone needed (up to 4), request:
- 1 x dynamic microphone
- 1 x XLR cable
If the power sockets are far away from where you're setting up, request:
- 1 x extension reel
Make the connections to the left speaker as shown below:
- Playing Recorded Sound from a laptop, phone, or CD player
-
Equipment Guide
To play recorded music or other sound, you will need a Public Address (PA) system as well as an appropriate cable to connect your playback device.
For laptops or phones, use a 3.5mm jack -> stereo ¼” jack cable.
For CD players or similar, use a phono -> ¼” jack cable.
When using more than 2 input devices, you will need a sound mixer as the PA system alone does not have enough input ports.
If you wish to mount your PA system, use a speaker stand set.
Ensure that you have all the appropriate power cables for the equipment. Most equipment requires an IEC ‘kettle’ lead, which plugs into a standard 13amp wall socket. Depending on the venue, you may need power converters/extension leads. For instance, you may need to convert 16amp power (blue and white socket) to standard 13amp power with a 16A -> 13A jumper. Additionally, check that your venue has enough wall sockets to power all the equipment. If not, request appropriate 13A extension leads. Consider also making safe any walkways where cables are crossing by using a cable trap.
Checklist
- PA system
- 3.5mm jack or phono -> 1/4" jack cables
- Sound mixer (if using more than 2 inputs)
- Speaker stand set (if you wish to mount the PA system)
- Appropriate power cables
- Cable traps
- Presentation/Film Screening
-
Equipment Guide
For displaying presentations/videos, use the portable projector.
If you need a flat surface onto which to project, please request a projector screen and stand.
To connect a DVD player/laptop to the projector, use an HDMI cable.
If you need to amplify sound as well, you will need a Public Address (PA) system as well as an appropriate cable to connect your playback device.
For laptops or phones, use a 3.5mm jack -> stereo ¼” jack cable.
For CD players or similar, use a phono -> ¼” jack cable.
When using more than 2 input devices, you will need a sound mixer as the PA system alone does not have enough input ports.
If you wish to mount your PA system, use a speaker stand set.
Ensure that you have all the appropriate power cables for the equipment. Most equipment requires an IEC ‘kettle’ lead, which plugs into a standard 13amp wall socket. Depending on the venue, you may need power converters/extension leads. For instance, you may need to convert 16amp power (blue and white socket) to standard 13amp power with a 16A -> 13A jumper. Additionally, check that your venue has enough wall sockets to power all the equipment. If not, request appropriate 13A extension leads. Consider also making safe any walkways where cables are crossing by using a cable trap.
Checklist
- Portable projector
- Power cable for projector
- Projector screen and stand
- HDMI cable
- Audio equipment as specified in "Playing Recorded Sound from a laptop, phone, or CD player" above (if required).
- Appropriate power cables
- Cable traps
- Interview/Conference/Music Recording
-
Equipment Guide
To record sound, you will need a microphone.
For a more portable microphone (suitable for interviews), use the Zoom hand-held voice recorder. This is battery powered and handheld. To download the sound file, you will need a laptop and either a micro-USB cable or microSD card reader (not included).
For recording multiple sources, or larger spaces, use any number of the condenser microphones.
These need to be connected to a sound mixer. Use the USB output on the sound mixer to connect to a laptop with recording software to record, as the microphones do not have their own memory. You will need a USB-B cable to connect the sound mixer to the laptop (not included) and XLR cables to connect the microphones to the mixer.
Ensure that you have all the appropriate power cables for the equipment. Most equipment requires an IEC ‘kettle’ lead, which plugs into a standard 13amp wall socket. Depending on the venue, you may need power converters/extension leads. For instance, you may need to convert 16amp power (blue and white socket) to standard 13amp power with a 16A -> 13A jumper. Additionally, check that your venue has enough wall sockets to power all the equipment. If not, request appropriate 13A extension leads. Consider also making safe any walkways where cables are crossing by using a cable trap.
Checklist
- Portable microphone (with enough charge in batteries)
- Your own computer with either a micro-USB cable or microSD card reader (not included)
OR
- Condenser microphones
- Sound mixer
- Your own computer with installed recording software and USB-B cable
- Appropriate power cables
- Cable traps
- Theatrical Production
-
Equipment Guide
Please refer to Public speaker/Live Music section for sound equipment.
If you require stage lighting for your event, you will need a combination of lights, data cables, and power cables, as well as a controller for the lights (lighting console). If you need to hang the lights, you will need a tripod and T-bar. LED RGB lights can produce a wide range of coloured light, while the warm/cold lights produce white light at varying colour temperatures.
To control the lights, use a DMX cable to go between the DMX output on the console and the DMX input on one of your lights. Then, to connect more lights, use the DMX out or thru port to connect to the input on a different light. Continue this chain as required. Use the menu buttons on the back of the lights to set the DMX number (d.) to the same number on every light (for ease, set to 1) or, if you need to control each light separately, choose different numbers based on the DMX profile of the light. The console allows for basic DMX channel control (1 channel per colour/intensity/etc.), so it is advised to set all lights to the same DMX number and control as a multi-fixture wash.
If you do not need control of the lights (dimming/color changing etc.), the lights can be plugged straight into mains power and turned-on full power. The mode button on the back of the lights also allows for various effects without being connected to a lighting console (colour-cycling, music-responsive, strobing etc.)
Ensure that you have all the appropriate power cables for the equipment. Most equipment requires an IEC ‘kettle’ lead, which plugs into a standard 13amp wall socket. Depending on the venue, you may need power converters/extension leads. For instance, you may need to convert 16amp power (blue and white socket) to standard 13amp power with a 16A -> 13A jumper. Additionally, check that your venue has enough wall sockets to power all the equipment. If not, request appropriate 13A extension leads. Consider also making safe any walkways where cables are crossing by using a cable trap.
Checklist
- Appropriate stage lights
- Appropriate cables for each, if control of lights needed
- Lighting console, if control of lights needed
- Appropriate power cables for each light
- Tripod (if you wish to hang lights)
- Cable traps
- Outdoor Events
-
Equipment Guide
For outdoor shelter, request a gazebo. To secure the gazebo, especially in windy weather or exposed areas, use the pegs and ratchet straps.
For suitable outdoor lights, use the LED floodlights, which are splash and dust resistant but should not be submerged or left out in heavy rain.
Ensure that you have all the appropriate power cables for the equipment. Most equipment requires an IEC ‘kettle’ lead, which plugs into a standard 13amp wall socket. Depending on the venue, you may need power converters/extension leads. For instance, you may need to convert 16amp power (blue and white socket) to standard 13amp power with a 16A -> 13A jumper. Additionally, check that your venue has enough wall sockets to power all the equipment. If not, request appropriate 13A extension leads. Consider also making safe any walkways where cables are crossing by using a cable trap. Ensure that all power cables are suitable for outdoor use (IP65) and that any open connections are protected (for instance, by placing the plug and socket in a waterproof plastic bag and elevating from the ground.
Checklist
- Gazebo (if shelter needed)
- Pegs and ratchet straps to secure the gazebo, especially in windy weather or exposed areas
- Appropriate cables suitable for outdoor use
- Cable traps
- Filming/Photographing
-
Equipment Guide
For photography and filming, request a DSLR camera. Please note that cameras do not come with SD cards.
For filming with audio, use either the separate Zoom hand-held microphone, to record audio separate to video, or the camera-mounted shotgun microphone to record video and audio together.
For mounting the camera, use a tripod.
For suitable lighting, use either the LED video light or refer to the Theatrical Production section.
Checklist
- DSLR camera (+ battery, case, strap, battery charger etc.)
- Your own SD card
- Hand-held microphone or camera-mounted microphone (if filming with audio)
- Tripod (if needed)
- Suitable lighting, if needed
How-To Guide
- How to set up a PA system
-
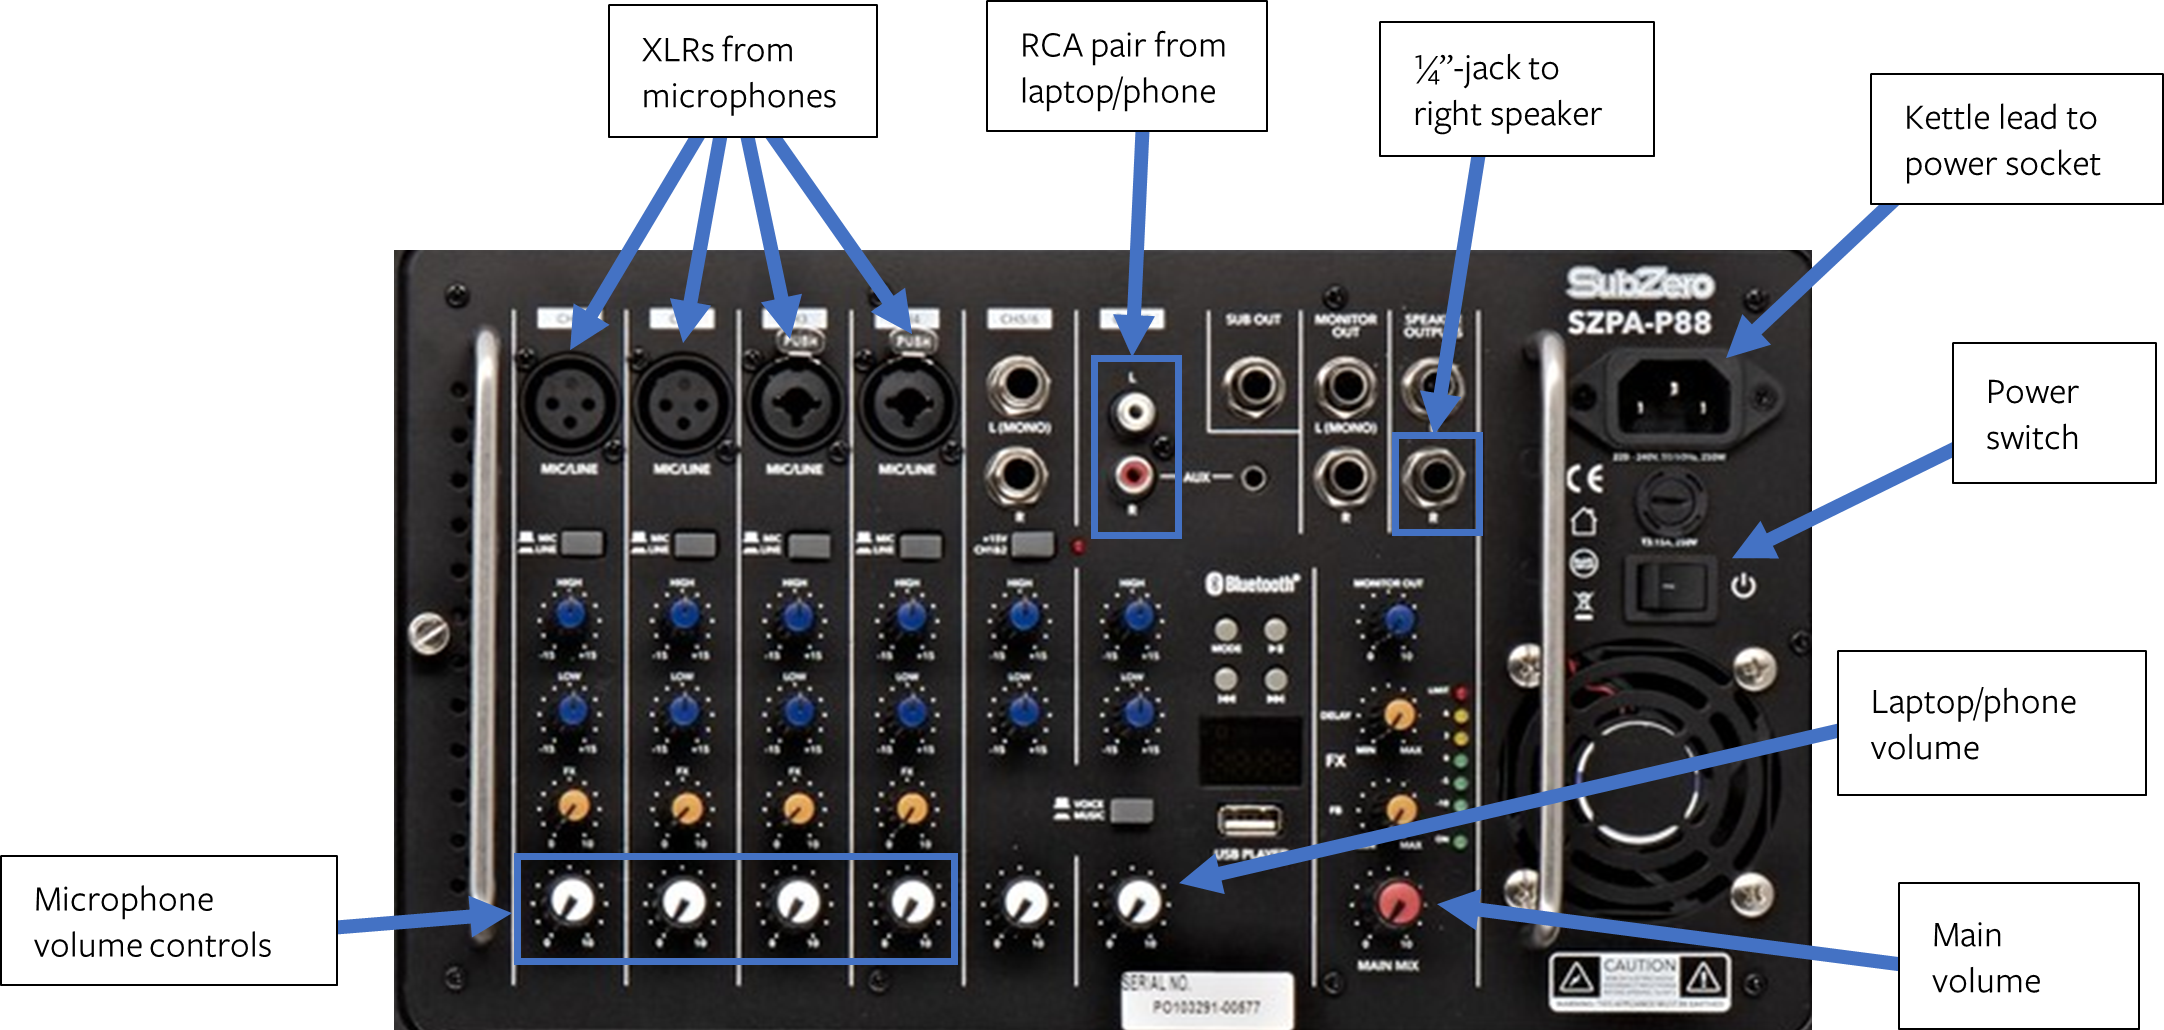
1. Determine how many microphones/inputs you need.
- If more than 4, request the sound mixer.
- You will need an IEC kettle lead for every piece of equipment which requires power
- You will need an audio cable for each device you are connecting. Check the shape of the output on the device to see which cable fits and refer to the images in the inventory.
4. Plug the speaker cabs into the ‘output’ of the amplifier panel.
5. Plug all devices into the amplifier
- If using without the sound mixer, plug the cables straight into the ‘input’ ports of the amplifier
- If using the sound mixer, plug all devices into the ‘input’ ports of the mixer, and then plug the ‘output’ of the sound mixer directly into the amplifier panel inputs.
If using condenser microphones, turn on ‘phantom power’. If not, ensure phantom power is off. If connecting a laptop to the sound mixer, turn off phantom power, as the power will damage the laptop.
- How to set up a sound recording system
-
1. Determine how many microphones/inputs you need.
2. Ensure that you have adequate power supply and cables.
- You will need an IEC kettle lead for every piece of equipment which requires power
- You will need an audio cable for each device you are connecting. Check the shape of the output on the device to see which cable fits and refer to the images in the inventory.
4. Plug all devices into the sound mixer ‘input’ sockets’.
5. Download sound recording software on your laptop, such as Audacity (free to download).
6. Connect the laptop to the sound mixer using a USB-B cable.
- The software should recognise the sound mixer. You may need to download a software driver.
8. If using condenser microphones, turn on ‘phantom power’. If not, ensure phantom power is off.
9. Record the sound using the software.
- How to set up a projector
-
1. Plug in the projector into a power supply.
2. Plug your playback device (laptop/DVD player etc.) into the projector using the appropriate included cable.
3. Your device should recognise the projector and automatically project the screen image. Different laptops may require setting to be altered. Check online for your specific device settings.
4. To alter the screen size, and geometry use the menu on the projector.
- Zoom will alter the size of the image.
- Keystone will alter the angle of projection.
- Focus will alter the blurriness of the image.
- How to set up a stage lighting system
-
1. Determine how many lights you need and whether you need to be able to control them live. If you need to change colours, use the RGB lights, if you need a warm/cold wash, use the LED wash lights. If you do not need control, consider using the floodlights as these require minimal setup.
2. Plug in all lights into a power supply using IEC kettle leads.
3. Use the ‘mode’ button to select the mode you want the light to be in.
- If you want to control the light, the display should read ‘d***’. This means that it is ready to receive data. If the light is one of the LED wash lights, ensure that the display reads ‘d001’. If the light is an RGB wash that the display reads ‘d006’.
- If you do not need to control the lights, press through the modes until you find one which you like, and then you’re good to go.
5. To control the lights, plug the lighting console into a power supply. Plug your nearest light into the ‘output’ of the lighting console using 3-pin DMX or XLR cable. Plug the output (or ‘thru’) of that light into the ‘input’ of your next light. Continue this chain until all of your lights are plugged into each other. You do not need to close the chain (ie. the last light in the chain will have something plugged into its input, but not its output).
6. On the lighting console, make sure that there is a green light on for scanner 1, on the left of the console.
7. You should now have control over the lights. Slide up the labelled faders. The first 5 will control the LED wash lights. The others will control the red, green and blue parameters of the RGB lights.
8. Check online for troubleshooting.
If you have any questions about what equipment you should book for your event, or how to set it up, please email the Student Activities Reception.
UCL Central AV Equipment
AV Equipment in UCL Rooms includes microphones (e.g. Lapel Microphones, Handheld Microphones), Projectors, Speakers, Projector Screens etc.
You can only book extra equipment if the room you have booked is already supported with AV. You can check this by heading to the Room Bookings Page and selecting to view the info for the specific room you have booked.
If you can see that it is already supported with AV you can make a request for further equipment for your event. Please ensure that you request this 10 working days or more in advance. If it is not requested in time, the UCL system will not allow the booking to be made.
To send a request for further AV - please email the Student Activities Reception with a full list of requirements for the event, the name of the event and the start and finish time of the event. Please include in the subject line 'AV Support for UCL Rooms - FAO Activities Administrator' so the email can be dealt with correctly.
Knowledge base
Category
- Room Bookings, Facilities & Equipment